
One morning while I was walking my dog around the neighborhood I noticed a old worn out bass guitar propped up next to one of my neighbors trash cans. Being intrigued by all things musical, I walked over and took a closer look.
The body was in pretty rough shape and looked like something straight out of the 80’s with an ugly maroon crackle paint finish. There was a plastic bag full of the original gold tone parts sitting next to it that also looked like they had seen better days. Anyone else in their right mind would have walked right by but something caught my eye. The rosewood neck featured intricately carved mother of pearl inlays of star shapes and the planet Saturn. I had never seen anything like it. Outside of a few scratches on the headstock the neck appeared to be in really good shape. I couldn’t resist. I quickly scooped it up and when I got home I tucked it away in a closet with grandiose dreams of one day rebuilding it.
Well eight long years later my wife found it buried in the closet of our new house and asked if I was ever going to do anything with it. The time had come where I needed to make a decision. Throw it out and let it slowly decompose in a landfill as it was intended by it’s original owner or restore it to a thing of beauty by rebuilding it piece for piece. Obviously I chose the latter. The irony here is that I don’t play bass. I play guitar and have for over 30 years. But hey who knows, I might like playing bass, and furthermore I couldn’t resist the challenge of a new project especially one that involved a musical instrument.
Researching My Find
First things first, I needed to find out what I was dealing with. After exhaustive research online I discovered that information on my 7000 Series Starforce Bass was not only difficult to come by but almost non-existent. What I did find indicated that they were produced for a short time between 1988 and 1992. They were distributed by Tropical Music of Miami prior to their purchase of the Dean company and later by Starforce Music Corporation in Miami, FL but here’s where it gets weird. Records show that they were exported for sale in Central America, South America, the Caribbean and the British Virgin Islands… making no mention of being sold directly in the United States. At the time of production my particular model was reported to have a MSRP of $425 US dollars and although this wasn’t cheap for the time it certainly wasn’t on the high end of the spectrum. However, several commenters who owned them indicated that despite the fact that they weren’t terribly expensive instruments, they were well made and played better than other pricey Fender and Gibson counterparts. One guy even said he preferred the tone of his Starforce indicating that the Skorcherz pickups had an edge and sustain that was befitting any rocker of the 80’s.
Documentation & Disassembly
With this promising new information in mind I got to work by first photographing every square inch of the instrument so I had a reference during reassembly. I then methodically disassembled the bass piece by piece. I really wasn’t sure which components I would reuse and which I would replace so I labeled each and every part carefully marking their location and taking note of the wiring scheme. In the end, due to condition I replaced nearly everything but the neck, body and pickups. I kept all the original parts just in case I ever needed them.
The Body
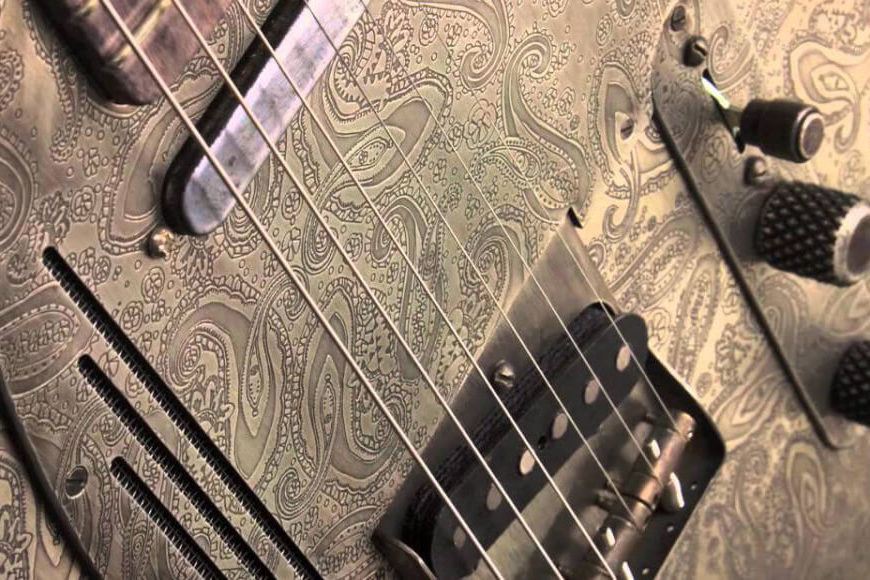
After it was fully disassembled I got to work on the restoration. I decided that despite the deep desire to keep it original I just simply couldn’t live with the maroon crackle finish of the body the way it was. This was a fairly easy decision since the body was littered with a dents and scratches that required patching. After patching and sanding I taped off the neck housing and other key areas with painters tape and hit it with a several coats of primer, sanding lightly between coats. I decided a dark metallic silver was the color I was looking for and my choice was quickly confirmed when I saw the first coat of paint go down. Several more coats of paint and five or six coats of polyurethane later the new color looked pretty sweet.
The Neck
As I mentioned earlier the neck of the bass was in pretty good shape but the headstock had some small nicks in it that needed a bit of attention. Here’s the rub though… The headstock had the original Starforce decal that I would never be able to find a replacement for. So somehow I needed to patch and repaint the damaged sections without painting over the decal. In order to do this I carefully cut a piece of blue painters tape to cover that section. I also taped the edges of the headstock, the end of the truss rod, and the entire neck for good measure. After hitting it with a few coats of matte black paint I peeled off the tape and took a look. You could see a feint line where the decal was masked out but this was nothing a few coats of satin polyurethane wouldn’t cure. It nicely blended over the paint line and the end product was near perfect.
The old gold-tone tuning keys were in terrible shape and needed replacement. After carefully measuring the placement of the mounting screw holes on them, I found some new polished silver ones on Amazon that looked like they would fit perfectly. Unfortunately when they arrived I realized that they were about a 1/16 of an inch off. However, since the turn action on the new keys was so smooth and mounting plates would cover any new holes I drilled, I made the decision to patch the old mounting holes and re-drill new ones. After mounting the new keys you could barely tell where the old ones were mounted.
The Electronics
Now the time had come to address the electronics but before I installed anything new I wanted to make sure my new bass wouldn’t be plagued by that annoying humming sound, therefore I shielded the main electronics control cavity with copper Buzz Kill tape and did the same for the pickup cavities. Since some of the knobs were sticking I purchased new potentiometers. I managed to find a pre-wired harness that the perfectly matched the original configuration. I then soldered the wires from the old Skorcherz pickups as well as the plug jack to the new wiring harness and ran my ground wire to the bridge to finish it off.
The Bridge
The original bridge which was in the bag of gold tone parts that I found with the bass but was in very poor condition. It was not mounted on the bass. Instead a Badass Bass II bridge had been mounted to the body and from what I could determine was done incorrectly. The alignment with the neck seemed off, and the height of the replacement bridge was far too low for the instrument. I suspect this is what led the original owner to abandon it in the first place. Although this bridge was pretty sweet and could have been salvaged, it didn’t match the finish of the new satin nickel tuning keys I installed on the headstock so I purchased a new one on eBay. I bought a Hipshot bridge with brass string channels that looked very similar to the Badass Bass bridge but felt more solid. To remedy the issue with the bridge mounting too low I ordered a piece of 1/8″ raw aluminum sheet and cut it to fit the exact shape of the new bridge. This would act as a spacer to increase the height so the strings would not hit the frets of the neck. I then drilled new holes in both the mounting plate and the body of the bass making sure I precisely measured the positioning of the new bridge to ensure alignment with the neck.
The Final Product
Given the fact that this is the first time I have ever rebuilt a musical instrument I had no real expectations but all in all I am happy with how it turned out. I think the new hardware and body color are a huge improvement over the dated look of the original. I definitely look forward to putting my Starforce bass through its paces and am always looking forward to the next project that will push the limits of my creativity even further.


Comment